Contents
- Contents
- Mobile Rogue-Like Game (History)
- Differences With This Game
- Project Developer Diary Playlist: YouTube
- Development Stage
- Menu
Mobile Rogue-Like Game (History)
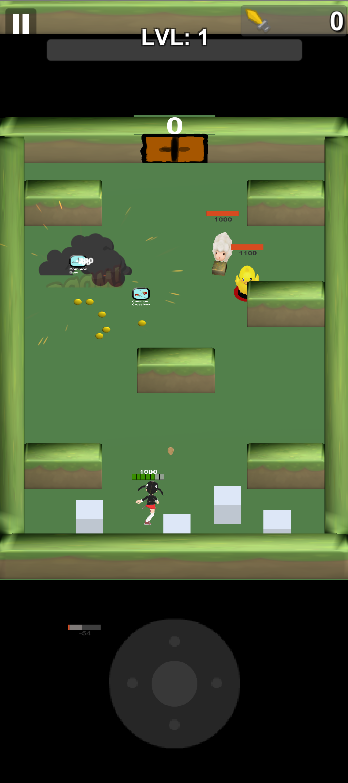
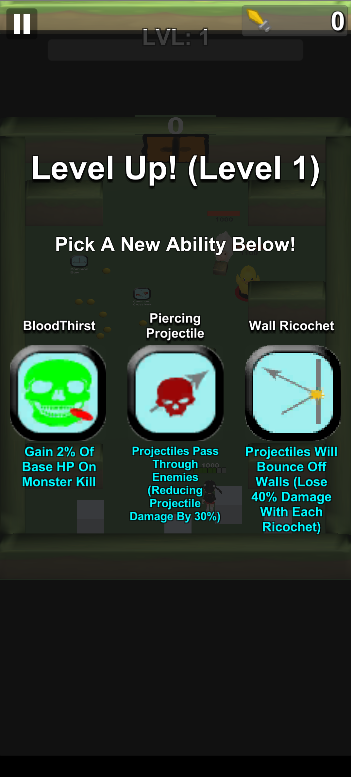
This project revolves around my indepently made mobile game, a currently un-named ‘Rogue-Like’ game developed in Unity. This project began following a long-running interest in these types of games. Many different versions of the same rough idea have sprouted out across mobile platforms, and seem to all bring a large following with them. The most popular example of this, is the game ‘Archero’ standing for ‘Archer Hero’. The premise of this game and those like it is as the player you move between several rooms filled with various enemies that attack you. As you move around, you try to dodge the incoming attacks. Standing still however, causes the player to start automatically targeting and attacking the closest enemy to themselves. Once a room is clear, the player is rewarded with in-game exp and they move to the next room. The real minute-to-minute excitement of this comes from the large varierty of abilities obtained throughout your playthrough. Each time the player ranks up, they are given a choice between three random abilities that will affect the rest of their gameplay. These abilities vary from increasing the amount of projectiles the player shoots, to adding various elemental effects when hitting enemies. As well as the in-game abilities, the player can collect a massive variety of equipment that will boost their stats throughout the game, encouraging the player to participate more and more to reach the further levels. It’s a very fast paced, hyper-active game that keeps players coming back for more with a free-to-play monetisation system. As a long time player of this game, and those like it, I decided it’d be a really interesting project to develop for my own first public game, and as such, this project was started.
Differences With This Game
When developing this game, in order to add more variety against other similar games, I researched some of the more specific criticisms fans have of these games. This is particularly easy to understand when following the Reddit for a particular game. Here you will find some of the most enthusiatic fans, and as such, you will see them present their most honest feedback about what makes the game good, and what could make it better. For example, one of the most common critiques I’ve seen mentioned revolves around the gaining of particular equipment. There are various weapon types that people are accustomed to, and in order to better upgrade these items, a ‘fusing’ system is in place requiring three of the same item in order to achieve the next rarity level and further improve the stats. With the ever-increasing item pool, and the randomness of obtaining a particular item, it requires a massive amount of game time or ‘grinding’ in order to have a chance of improving a particular item you’re used to. That’s why with the game I’m developing, one of the core ideas will be to make specific character types which each have certain equipment sets. When playing through levels, they will only have a chance of dropping items specifically for that character type. This means that players can essentially level various characters separately from one another if they have a particular play-style. I belive this will make a significant improvement with player feedback. I am also planning a much more in-depth customisation system that will allow the player to really customise each of their pieces of equipment through varying attachments, effecting specific stats over others. So if for example, a player wanted their weapon to focus entirely on firing as fast as possible, then they could adjust their item in such a way that increases the attack speed, while reducing it’s damage and critical hit chance. This system is not entirely planned out yet, but will hopefully be quite complex in the varierty each player can experience.
Project Developer Diary Playlist: YouTube
Below you can find the playlist to where I am adding new development updates whenever a large amount of progress on the game has been made
Development Stage
Currently, this game is firmly in the early stages of development. A lot of the core gameplay mechanics through the level are there, but variety in characters, or weapons or enemies is still limited as these are quite big areas to expand on. I am currently in the process of working more in-depth on the menu scene and specifically the customisation of items. The next step after this will be to start having the changes made to items in the menu affect the stats of the player within the gameplay.
Menu
I’d like to now go through the menu scene of my project and explain all the features including some technical implementation.
Menu Interaction
Drag Detection
As a mobile game, the menu scene features several different screens which the user can move between either by selecting one of the buttons at the bottom, or by dragging their finger across the screen. This was the first feature I set up, as I always planned for there to be multiple menus available. After spacing the panels out as children of my canvas component, I created a parent object called ‘MenuScreens’. Here, I created a script to detect player drag input and in response, the parent of all the screens would be moved in order to position the relevant menu in the display window. In an ‘OnDrag’ function, which takes in PointerEventData, the amount the player has dragged in the ‘x’ axis is calculated.

As we drag, we constantly update the RectTransform’s local position to be the starting position minus the amount dragged. This keeps the screen moving with the drag. In the ‘OnEndDrag’ function, it calculates the amount dragged as a percentage of the width of a screen panel. If this percentage is more than a set threshold of 50%, a function is called on the ‘UIController’ to calculate the response. This function calculates the distance between each of the five menu screens and the current anchored position of the parent object. Whichever screen is detected as the closest is the one we will slide the display towards upon releasing the drag detection.

Button Presses
Button presses for the different menus link to a ‘ChangeMenu’ function in the UIController. In here we detect which button was pressed by casting the integer to it’s relevant enum value.

This will then call the function for that menu screen which moves the parent object into view.
Inventory Details
Most of the menu screens currently don’t contain much data, apart from the inventory menu, which is where most of the work has currently been dedicated to.
Refresh Inventory
When we select the inventory menu, we first call an event to refresh our player’s inventory. This event is subscribed to a function ‘RefreshInventory’ on the GameManager object. More about script communication later. This refresh function goes through an ordered process. It first checks if there are any existing items in the player’s inventory to be loaded in. It currently does this by checking a specific folder in the device’s persistent data path, under the game save data. We check the number of folders representing unique item IDs and return this to the GameManager.

If there are any existing items for the player, we add them to a list which is then passed to the sorting function before invoking an event to create the prefabs for these items. The next step of the refresh process is to determine if any new items have been picked up through playing the game and add these to the current list of items to load. To achieve this, we check the list of enum values stored on the class data Scriptable Object used in-game. For each of these new items we invoke another event to spawn the prefabs for new items.
Instantiating Item Prefabs
The two functions for instantiating item prefabs work similarly. One is for existing items and the other is for creating new items for the first time. When creating a new item prefab, we pass in the details of what item type it will be (weapon, armour etc), and the specific item enum. We then instantiate a prefab for the type of item and create a new scriptable object to hold the data of this specific item. The data file will be used to save all the details of this item between scene changes and when opening and closing the game. Every time a change is made to an item, it will overwrite the saved data for it. As part of this process, we assign each data file a random id value on creation, which is unique to that specific item. We use this id value in the saving process too.


After creating a new data file for each item, we assign some of the default values based on what we know about the item already. Most of these base values are predefined in a serialised Dictionary in the engine inspector.


This means that throughout the development process I can easily change values for testing processes which will affect any items I equip. As well as the data file, we also must fill in the data we use for serialising the prefab in the game. We assign the data to the script attached to the prefab of the GameObject, which will be used until the inventory is next refreshed. Finally, we assign the click event to the button representing the item in the inventory display. This means that when the item is pressed, it will open the ItemOverlay screen and know the data specific to the item pressed.

The function for existing items works mostly the same. The only difference here is that instead of filling the data file with default data, we fill it with the saved data from this item that already existed before.
Item Overlay
The Item Overlay is a panel used for displaying and adjusting the details of specific items in the game. It is here that the player has direct control over how to change and upgrade their items. When a player presses on an item in the inventory, the overlay will be displayed and will show important details including the Item’s name, rarity level, a description as well as how the stats for the player will be adjusted with this item equipped. There are then various buttons for the player to choose from including an ‘equip/unequip’ button, setting this as the current item in use for whatever sub type of item it is. There is also an upgrade button which will require a certain amount of currency obtained to complete and a customise button, where the item can be more adjusted to suit a specific playstyle.

The data for this overlay is determined by the item that has been pressed. When we instantiate each of the items in the inventory, we add a listener to their button overlay, which is subscribed to the ‘OpenItemOverlay’ function through the code. This function takes in the GameObject of the specific item as a parameter, so that it can then get the item details stored on a script in each item prefab. It uses this data to set the various elements of the overlay so each time an item is pressed it will be the data for that specific item.


Upgrading An Item
There are two forms of upgrading the stats of an item. Levelling up, and merging.
Levelling Up Items
Levelling an item up is done through the item overlay where when opened we subscribe the Upgrade button to a function ‘UpgradeItem’ which takes in the prefab of the item object we use in the overlay. The first thing this function does is determine the type of item we are wanting to upgrade. It does this with null checks. If the weapon script component is attached to this item, then we know we are dealing with a weapon.

Once we have the correct data script for the item we wish to upgrade, we must first go through some checks. Each item has a currentLevel and maximumLevel value. The maximumLevel is based on the rarity level of the item. Before we upgrade, we make sure that the item is currently below the max level. We also must check if the user has enough coins picked up in order to upgrade to the next level. Each level up will increase the coin cost of the next upgrade, so that the player is encouraged to play more and save up their currency.

If the item passes these checks, we then upgrade the level and stats of this item. The stat change per each level is also based on the rarity of an item. When we instantiate each prefab, there are dictionary defined values for the change per level, and when we increase the rarity of an item, all the current stats must be re-calculated accordingly to fit with the stat adjustment per level. The final step of levelling up an item is to re-calculate the coins needed for the next level up. There are functions containing algorithms for setting these values each time an item is upgraded.
Merging Items
Merging an item takes place from the inventory grid screen. Above the items there are two buttons, one for sorting the order of items, and one for merging them together. When the merge button is pressed, the player is brought to a merging screen and the inventory is re-ordered by items marked as ‘mergable’ first. An item is mergable when there are at least two other items of the same type and rarity in the player’s inventory. For example, if I have three common bows, they would all be marked as mergable items and so would appear at the top of the inventory.

When any item in the inventory is pressed, it is moved to the first merge slot and all items that are not of the same type and rarity are blocked from pressing, indicating to the player what other items are able to be merged with the selected item.

Once the player has filled all three slots, a new ‘merge’ button will appear. When this is pressed, the second and third selected items will be destroyed and removed from the player’s inventory. If they had been upgraded through levelling up, the player will be rewarded the coins spent on upgrading them. The first selected item will become the newly upgraded item. It will keep it’s same level but will have increased to the next rarity higher. This will then increase the level up cap, as well as increase some of the base stats of the item, to make it more useful. In the future I may also add unique bonuses to the higher rarity items. The item’s rarity is upgraded through the ‘UpgradeItemRarity’ function. Using the ItemData of the first placed item, we determine what the item of the next rarity higher will be. This currently involves a big switch statement in which we set the specific itemType depending on what the previous item’s rarity was. We then determine what sub-type of item it is and create new Data files for the ‘new’ item.


Equipping Items
Currently, the equipping of an item does not do so much other than visually display on the inventory. Above the list of items the player has obtained, there are slots for a weapon and armour. In the future there will be additional slots for the other types of equipment. When the player selects an item from the inventory, there is an ‘equip/unequip’ button found next to the upgrade button. When this is pressed, the item is moved towards the corresponding slot and removed from the full list of items. It is marked in the code as ‘equipped’ so that when the game is re-loaded, it knows to display the item in the correct slot.

Equip Code
In the code, we first determine the sub type of the item we are equipping. Based on this, we know what location we will want to move the item to. We also assign a swap position for when there is already an equipped item which we will replace. The current equipped item will be animated back to this location before being added to the list again.

After determining where we are going to move the item to, we do this using a tweening animation library, known as ‘DOTween’. We move the item to the location of the slot before parenting it to the slot. We then update the item’s data script to set it as ‘equipped’ this means when the user re-selects the item in the slot, it will know to change the text on the button to say ‘unequip’ instead of ‘equip’.

In the future, as the player equips different items, there will be some stat values displayed on the screen which you will see automatically update accordingly.
Customising Items
While developing my item system, I considered the possibility of giving the player as much control over how their item behaves as possible. The idea of customising each item to their liking. This brought me to my current system, (the most recent project addition) whereby the user can assign points to each of their items to adjust specific attributes.
Item Attributes
Item attributes are the specific stats that are relevant to different types of equipment. As such, all types have their own attributes the player can choose to focus on. Currently, this has only be implemented for weapons and armours, as I am yet to plan out what some of the attributes of my other item types might be. With weapons, there are common traits across all of them. These are the amount of damage a weapon outputs, the speed at which it can attack (attack speed), the chance of a critical hit, and the accuracy (currently refers to projectile speed). For armour types, there are attributes for the amount of Player health, their armour protection (hits taken with no damage), elemental damage protection, and bonus movement speed.
Customise Screen
When the player selects an item in their inventory and presses the ‘customise’ button, they are brought to a customise screen. This shows them the current value of the various attributes for this item as mentioned above.

Below the current values is a separate section, informing the player of the current points they can spend on this item (10 max) and several bars representing the attributes. Each of these bars contains ‘point bars’ to show the number of points assigned to each attribute. This information is also shown through the number value on the right side. When the player presses either side of one of the bars, a point is either added or subtracted to the specific attribute and re-calculates the remaining allocation points available.

Attribute Rules
There are certain rules about how a player can assign attributes. Although having 10 points to spend across the different attributes, there is also a maximum amount that can be allocated to each, depending on the rarity of the item. For example, a common item will only allow a maximum of two points to be assigned into each attribute. Applying any more will cause an error message to be displayed.

This means that the player can still assign two points into each attribute, but they are encouraged to merge into a higher rarity if they wish to apply more into each. The uniqueness of items comes at a higher rarity, where a player must choose how they want to spread out their ten points. They can choose to spend it all on damage, while sacrificing their other attributes, or they could go all in on maxing out their crit chance. The choice is up to the player, and how they prefer to play. If they apply a certain number of points into a specific attribute, they will receive a buff related to that stat. For example, five points into damage will give them a further added boost specifically for focusing on this attribute. If the player chooses to spend all ten of their points on one attribute (which will require a higher rarity item), my current plan is that they will receive a unique ability that can be obtained in-game (only obtainable through customisation).
Code
The first part of the customise function is to determine what stats to be displayed at the top of the screen. This is done with a switch statement on the item type. Therefore, whatever item is being customised, it will have the correct attributes displayed.

We set the value of these attributes in a separate function called ‘RefreshCustomItemData’. The stat values are saved on the saved item’s data file after being initially defined in the item dictionary mentioned earlier. Similarly, the number of spent points for each attribute and remaining points is also saved to each item and is updated whenever a change is made.

Once the current stat values are displayed, we then add listeners to the various buttons of the attributes through code. We assign the add and subtract buttons to an ‘AdjustItemStatCustomPoints’ function, and additionally assign the button for the middle section of the box to a new function for displaying more details about the specific attribute. The function for adjusting stat points takes in a bool value (addition or subtraction), the data file for the item and an enum value representing which of the four attributes are being adjusted. We then check if the item has any customise points remaining before applying to the relevant attribute.


Attribute Details Screen
If the player presses on the centre of one of the four attributes for an item, they are brought to a new screen, which will display more details about the selected stat.

This screen will display the item details at the top of the screen, including the name, level, and specific stat we are customising. There is another bar displaying the number of points used for this stat, similar to the customise screen. These can be re-adjusted here using the plus and minus buttons. If the user adjusts the points here, they will see in the box below the difference to the stat value with the current points applied. Additionally, if one of the individual points is pressed in the bar, another box will appear. This box informs the user of the changes that will apply with this specific point applied.

Currently, most of the points will display the same information as they will increase the stat by the same amount. If the user presses the fifth or tenth point however, it will tell them the aditional bonus they get for having so many points into this attribute applied.

If the player is currently unable to apply the number of points they are viewing the details of, this will be explained to them in a separate box, as well as inform them what they need to do to obtain this point. This allows the player to have full understanding of how their item points have been applied, and how they can further improve it to their liking.
Classes
When designing my game, there was a particular issue that I wanted to address. As a long-time player of these mobile rogue-like games, I have paid attention to some of the key design issues that enthusiastic players have problems with. The main one of these seems to be the RNG (Random Number Generation) when it comes to dropping loot for a player. Due to the developers creating such a large pool of items, it makes it extremely unlikely for a player to receive a drop for an item they want or use. This leads to frustration over having to endlessly grind for the small chance of getting the item they want. As such, I have designed the class system to help alleviate this problem.
Class Items
With this system, the items a player can be in possession of are linked to each of the various class types. This will include for example, two similar types of weapon, such as bows and crossbows for the Archer class. While a player is using a specific class, they will only receive item drops relevant to their selected class. This means they will not receive a random weapon that they would have to change classes to use. This is also advantageous because it allows for the player to grow each class separately from one another and find their preferred playstyle. Eventually this could lead to more of the game’s content being focused on specific class types such as unique levels or challenges.
Changing Classes
Currently, the player will see the option from their inventory to change characters. When this button is pressed, a new screen will be displayed with all the available characters of their current class.

In the future, there will be sprites to represent the various characters. This screen will show the player what some of the default stats are for the chosen character. Unlocking new characters within a class can slightly improve these various stats. It is currently planned for each character to have their own levelling system. On this screen there is also a button to change the selected class. This will again open another new screen, with a list of all the classes available.

At the top of this screen are stat details for the current class, as well as their current class level. Different classes will be tailored towards specific stat types. Levelling up a class (by using in-game) is how the player will unlock additional playable characters. In the list of classes, there will be several details viewable to the player, including a description of each class and icons to represent their various equipment which can be used. In the future I will probably make a more detailed screen or when a class is pressed, more details will be displayed to the player. If a class is pressed currently, the player will be given the choice to switch their current class. Once selected, the stats displayed above will be adjusted to represent the newly selected class.


Returning to the character select screen will display the unlocked characters for this newly selected class and returning once again to the inventory will refresh it with the equipment for this class.

Saving Gameplay Data for Resume
As a mobile game, it is important that the player has the option to resume their current progress in a level for when they have closed the game before finishing a level, for whatever reason. As such, the next big part of the game’s development has been implementing the saving and loading of their current progress through a level. There are several parts to this because various types of data are updated at different intervals.
Initial Gameplay Save
When the player has selected their chosen level (currently there is only one level scene) and presses the ‘Play’ button from the menu, we save a new file and folder to the device persistent data path, which indicates the player has started a new run of the level. From this point, whenever the game is launched, we will check whether this folder exists. If it does, then the system knows the player has game progress they may want to resume. We then display a new pop-up asking the player if they would like to resume their progress or not.


Currently, this is quite basic, with the option to either resume progress, or cancel and delete their current progress. In the future, I would like this panel to provide additional details to the player about their current progress, such as what stage they have reached.
The initial save function is made up of multiple sub-data types, including the player’s stats (health, damage etc) and the room data for the level.
Level Room Order
If a level is launched without resuming, the stage manager will now create a random order for the rooms to appear in. Previously, it was calculated each time a player moved to a new room what would come next, but this was not particularly useful for the resume feature, as I want the experience to directly carry on from when the player closed the game

This is done through a new function which creates a list of transforms for the starting point of each room when the player enters. For however many sets there are of ten rooms in any level, I first pick four random normal rooms, followed by a randomly selected ‘angel room’, then another four normal rooms, before finally picking a boss room to finish off each set of 10. After the whole level has been ordered, I insert the starting room into the first index of the list

This creates our full ordered level of rooms. After the initial setup, the names of each room are saved to a list of strings in a file, which makes up the room data, along with the current room of the player. When the level is resumed, we use this string list to re-create the correct room order and place the player in their last completed room.
End of Room Gameplay Saving
After the initial save has been created, each big update to the saved data is performed when a room has been marked as completed. For this, we make sure the saved stats for the player are up to date, and we also save the list of potential items they may have picked up from a level as well as the next room completed value. The advantage of having the big data save at the end of a room is that there is then no potential disruption during regular playing, which could cause the player to lose focus, particularly if using an older mobile device.
Regular Minor Gameplay Saving
Currently, there are only a few situations where data is saved regularly, such as the player’s health stats. This is so a player cannot get a ‘free pass’ when attempting to restart their device to perform better in a room. Whenever a change is made to the player’s current health or max health, a small save function is called to update these specific values. As this is only a small amount of data being exported, it does not cause any slowdown to the constant gameplay

The only other minor saves that currently exist are for when the player levels up, so that we can keep their current exp values when resuming, and whenever a new ability is selected, so that it can continue to be used, should the player resume their game. You can find below an example of this, using the exp data. This is the same process used for the saved abilities.
Exp & Coin Saving
Whenever a room has been marked as completed, there is a process of finding all the coin prefabs and adding their total value to calculate how many coins the player has gained for this room. This value is then sent to the PlayerData script through an event, where we add this room’s coins to the player’s total amount. Once the player’s total is updated, the UI controller begins to animate the change in coins, and a new save event is called for updating the saved total.


As well as each coin prefab containing a coinValue, there is also an additional value for how much exp the player gains. Whenever the player comes into contact with one of the coins, a new event is sent to the PlayerData, containing the amount of exp to be added.

After calculating the player’s current level data, we call another save function which will update the stored level and exp-related data.

Exp Loading When Resumed
Now that the current exp data is saved to file each time the player obtains a pickup, we can use this saved data when the player chooses to resume their progress. In our setup function for when the game has resumed progress, we first get the needed data from file, to be used for inititalisation.

When the request events are invoked, the save manager will automatically find the required save data and send it back to the PlayerData class, ready to be used.

Once the saved data has been obtained, it can now be used to initialise UI elements such as the exp bar and level number to where they previously were left, by updating the values which control these.

